If you want your winch line to deliver you the best, then you need to install it properly. Proper installation of the winch prevents the rope from damage and works efficiently. But it’s not easy to install a warn synthetic winch rope. They have a different process, and you need to learn it. To help you with that, we are here with a new article, and in this article, we’ll be guiding you about how to install synthetic rope on warn winch. Read to the last.
Table of Contents
How To Install Synthetic Rope On Warn Winch
Firstly, for properly installing a synthetic rope on warn winch, you need to identify the model and find out the type of job for it. The since model differs for different types of work-load. If you use incapable winches for a heavy task, your work will fail immediately. So do you want to know how to install synthetic rope on warn winch? Here’s how to do this-
Step 1: Inspect The Winch
Before you start to inspect the winch, first disconnect any electrical connection. Remove the steel cable and the device which guides the rope (Fairhead). The look for any sharp or pointy objects in the drum. The sharp objects can damage and tear the ropes. Even the steel cable can damage the drum. So inspect thoroughly. If you find any sharp object, take sandpaper or any compatible device and smoothen the drum.
Step 2: Install The Fairlead
Before you tie the rope, the fairlead needs to be installed first. The synthetic winch lines need to be smoothly operated to prevent them from damage. And to protect them, it is recommended to use aluminum hawse fairleads. The cast steel ones don’t give a smooth feeling and result in cable damage. The alternative way is to use steel rollers as they help in a more smooth transition and no sharp objects (in most cases).
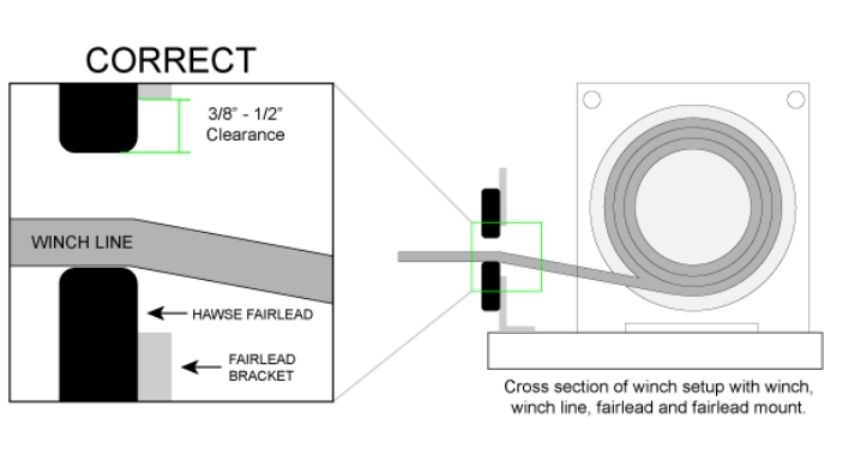
While installing the fairleads, you should keep in mind that the rollers should overlap each other. Suppose the rollers don’t overlap each other(like the old fairleads rollers). In that case, there can remain and gap in the corner, and eventually, the cables may get stuck, and it can get torn or damaged!
Another important thing is keeping proper clearance. The fairlead openings and mounting plate end should have enough space in between them. The ideal clearance should be 3/8″ to 1/2.” If the clearance is not appropriately kept, the winch can get damaged.
Step 3: Slide The Rope
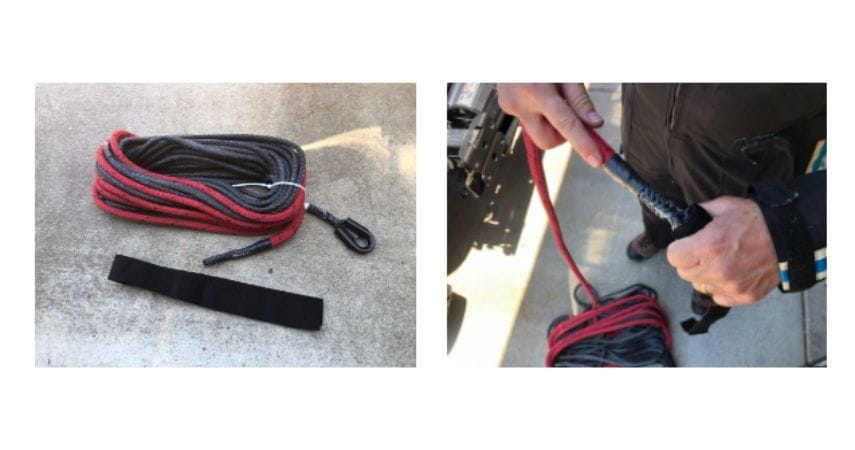
Check to see if the synthetic rope comes with abrasion or not. Typically, the synthetic ones do come with an abrasion sleeve. Glide the sleeve to the endpoint of the cable. Then take the rope and pass it through the fairlead and roll it around the drum starting from the bottom. Now again, grab the rope and pull it over the winch drum partially.
When you are done with partially pulling the ropes through the hole, hold the wires with pins or pliers. Now you have to do two tasks at a time. Start wrapping the wire, and at the same time, pull the rope from the hole. Pass the rope through the hole or pocket. This helps the rope puck sit in the middle of the roll. After that, remove the wire and mount the rope puck. The rope puck anchor is used to secure the winch rope/cable to the drum.
Pull the string out of the drum. It would also take the puck out from the drum. Keep in mind that the puck shouldn’t fall out of the loop. The puck gets easily settled in the drum without any hassle. As the puck rests firmly on the drum, the eyelet will not move anymore, and everything will just hold tight to the surface.
Step 4: Check The Wire Tension
After you’re done with the above procedures, connect the electrical connections and the winch’s negative connections. Check if the clutch lever is in an engaged position or not. If not, place it in the engaged position. Now roll the wires in the drum.

Gently pull the wires to give a light tension and see if everything is working fine or not. If it works perfectly, spool the rest of the cables with a little more pressure than the previous one. Before rolling the whole cable roll, first, unroll them and lay them in the ground. And then try to recoil the drum. This is a lot easier and efficient process.
After you’re done with everything, try to pull in and pull out the cables a few times. This will help you understand if the winch cable is working fine or not. Here is a final look at the end result. After each use, it is advised that unwrap the entire winch line and re-wrap it properly.
So that’s it when it comes to how to install synthetic rope on warn winch.
How do you replace a Warn winch cable with synthetic rope?
To replace a warn winch cable with synthetic rope-
- Grab the tools
- Disconnect the connections
- Disconnect the winch driver
- Remove the old winch cables
- Follow the processes mentioned in how To Install Synthetic Rope On Warn Winch to install the new cables.
Conclusion:
Installing a synthetic rope on warn winch is not an easy task at all, so we tried to break it into small parts and make a detailed guideline. We hope we could clear out the things in a simple way, and now you know how to install synthetic rope on warn winch. Still, for any queries, leave a comment below. Don’t forget to share your experiences with us. Good luck!